
The Best Acrylic Nail Kit
Our Review Process
Don't Waste Your Money is focused on helping you make the best purchasing decision. Our team of experts spends hundreds of hours analyzing, testing, and researching products so you don't have to. Learn more.

Our Picks For The Top Acrylic Nail Kits

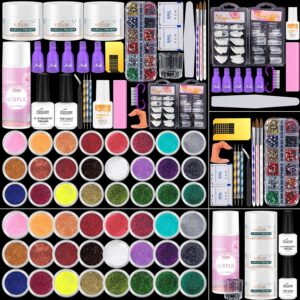
Whether you're a newbie or a salon veteran, this set has what you need. You get a huge variety of glitter and powder to play with, and a proliferation of tools, French tips and cotton pad means you won't need to resupply anytime soon.
Tons of MaterialThere's no shortage of glittery colors or helpful tools in this acrylic nail kit.
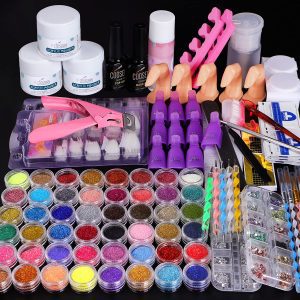
This extensive acrylic nail kit is ideal for those curious about nail art. It has everything you'll need apart from nail glue, including rhinestones, tools, French nail tips, and even practice fingers. The glitter powder comes in a wide variety of colors.
Solid Practice SetNew nail art enthusiasts can hit the ground running with this complete set.
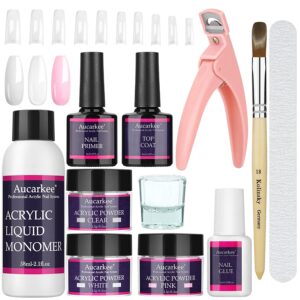
You don't need an LED lamp to use this acrylic nail kit. It comes with a set of tips and three colored powders - white, pink and clear. Also included is a set of nail clippers, a brush, nail file, glue, primer and topcoat. Everything you need to have a salon experience at home.
Economical OptionThe budget-friendly price tag on this acrylic nail kit makes it ideal for gift giving.

There isn't anything this acrylic nail kit doesn't include. From a nail drill with multiple bits to several bottles of acrylic powder, this set has you covered. In fact, you'll even be able to create 3D manicures with the tools in this kit.
DIY ExperienceWith this acrylic nail kit, you could begin a professional side gig for some extra cash.
Buying Guide
Some might dread going to the nail salon, while others see it as a choice opportunity for both conversation and relaxation. But anybody who has walked out with a carefully applied manicure can’t deny the results: knockout nails that you can coordinate a whole outfit around for weeks.
Now, it’s not exactly a secret that you can get those same results at home with a lot of practice — and of course, the right nail kit. The trick is in finding that kit, and the components can vary widely depending on your level of experience and desire for nail bling. Gel or the more expensive polygel nail kits can be easier to apply, as long as you’re willing to spring for a UV lamp. But when it comes to longevity, strength and the possibility for truly creative nail art, there’s nothing like old-school acrylic nails.
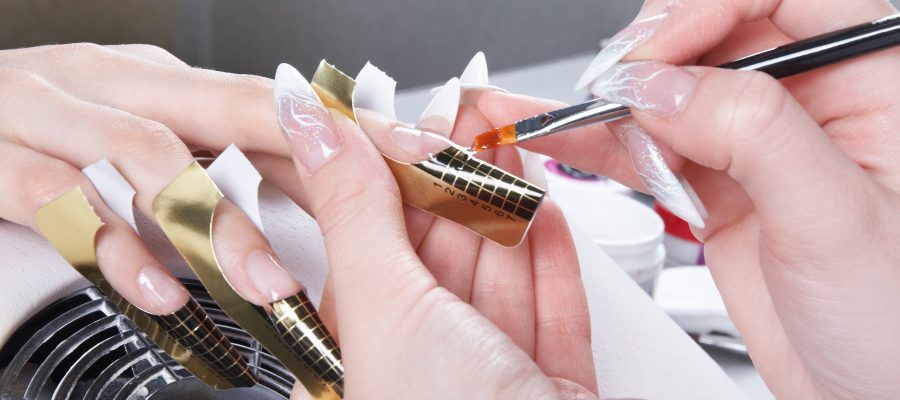
If you’re buying an acrylic nail kit, it can be easy to get distracted by the range of colors and the shine of the glitter. Do yourself a favor and make sure you’ve got the basic components first. Since acrylic nails are actually synthetic nails that bond onto your natural ones, you’re going to need those nail tips, nail tip glue and a dehydrating coat that you can apply to your nails beforehand. Most nail tips these days are made from ethyl methacrylate, but stay away from older ones made from the harder methyl methacrylate, or MMA. It may seem like only a one-letter difference, but the FDA has found that the latter substance can cause swelling and other allergic reactions in some users.
Next up: The fun stuff. Once those nails are on securely, you’ll want to apply a primer coat. After that dries, you can start applying the actual acrylic paint, and that’s where a bit of science comes in. Acrylic nails require a mixture of liquid monomer with acrylic powder. Get the mixture just right, and your nails won’t just look great, they’ll actually be stronger and can last for four weeks or more. Get it wrong, and you can end up with blotchy claws that will end up worse for the wear in the long run.
For this reason, beginner nail kits should ideally include some model nails to practice that mixture on. As a broad rule, you’re going to want a ratio of one part powder to one and a half parts liquid monomer. There’s some wiggle room there, but try not to add any more liquid than a 1:2 ratio. If your mixture goes from a firm bead to a puddle on the nail in less than 20 seconds, you’ve probably mixed it too wet. Good, fresh powder can make a lot of difference here, so watch out for powder that seems too chalky.
That’s it for the chemicals, or at least the essential ones. Of course, the sky is the limit when it comes to the various colors and extra bling that you might want in a true nail art kit. Once you’ve got the basics down, you can try dressing up your acrylics with glitter, rhinestones, decals or stenciled paintings if you’re really confident in your artistic skills.
Don’t forget the tools, either. You won’t be able to apply any of that acrylic without some brushes, and shoddy ones can wear out very quickly — especially if you’re mixing your polish too thickly. If you’re shaping your own extensions, you’ll want an acrylic mold, and emery boards and clippers are a must. Once you start getting the hang of your home manicure, you’ll inevitably want to resupply and try out new colors or appliques. The trick is to find a starter kit that gives you enough product to practice with at a price you can afford.
What to Look For
Once you get that nail kit, it can be tempting to just slap on that extension and start picking your polish. In a word: don’t. Preparation is crucial to sturdy, great-looking results and acrylics slapped on to poorly-filed or wet nails can hurt the next day.
First, file down your nails so that you only have about a millimeter or so of space at the edge. Wipe down the nails with some anti-bacterial spray and push your cuticles up carefully with a fine edge. Dry the nails thoroughly, apply some primer and you’re ready to go.
You May Also Enjoy Our Other Reviews
- Robotic Vacuum
- Cordless Vacuums
- Air Mattress
- Drone
- Electric Razor
- Convertible Car Seat
- Infant Car Seat
- Dry Dog Food
- Carpet Cleaners
- Air Fryers
- Laptops
- Home Printers
- Wireless Router
- Streaming Device
- Electric Pressure Cooker
- Chromebook
- Television
- Digital Camera To Capture Special Moments On The Fly
- Smartwatch
- Upright Vacuum